Getting Started with Godspeed
This guide provides a step-by-step guide to install and get started with Godspeed Meta-Framework. It covers the prerequisites and installation process, both manual and using easy installation scripts. You will learn how to create your first Godspeed project or service, run the development server, access the automatically generated Swagger UI, and test a basic helloworld API. The guide also includes troubleshooting tips for common errors and a walkthrough of the project's scaffolding structure.
Whether you're having trouble with setup, configurations or understanding the framework, try asking Godspeed GPT or you can access the FAQs in the Guides section
Watch this One-Click Installation Guide
Installing Godspeed
Quick Installation
Windows Users
- Download the setup.bat file
- Open Command Prompt as Administrator
- Navigate to the download location
- Run:
setup.bat
Linux/Ubuntu Users
- Download the setup.sh file
- Open terminal
- Run:
sudo bash setup.sh
Manual Installation
Prerequisites
Before installing Godspeed manualy, ensure you have:
- Node.js (v18 or higher)
- npm (Node Package Manager)
- Git
- VS Code or any preferred code editor
1. Verify Prerequisites
Check if required tools are installed:
# Check Node.js version (should be v18 or higher)
node -v

# Check npm version
npm -v

# Check Git version
git -v
If any command returns an error, install the missing tool:
2. Install Godspeed command
Install the Godspeed framework globally:
npm install -g @godspeedsystems/godspeed
3. Verify Installation
Confirm successful installation:
godspeed --version
Creating Your First Project
- Create a new project:
godspeed create my-project
- Navigate to project directory:
cd my-project
- Start the development server:
godspeed serve
Access Swagger UI
In Godspeed, the Swagger UI is typically accessed at the
/api-docsendpoint, appended to thebase URLandportwhere the server is running. Here’s the general format for accessing Swagger UI:http://<BASE_URL>:<PORT>/<http_docs_endpoint>` which is by default `localhost:3000/api-docs`Default port of your service is
3000and Swagger endpoint is/api-docs. If you want to customise default settings, you can modify the./src/eventsources/http.yamlTo access Swagger UI, navigate to the following default url:
http://localhost:3000/api-docs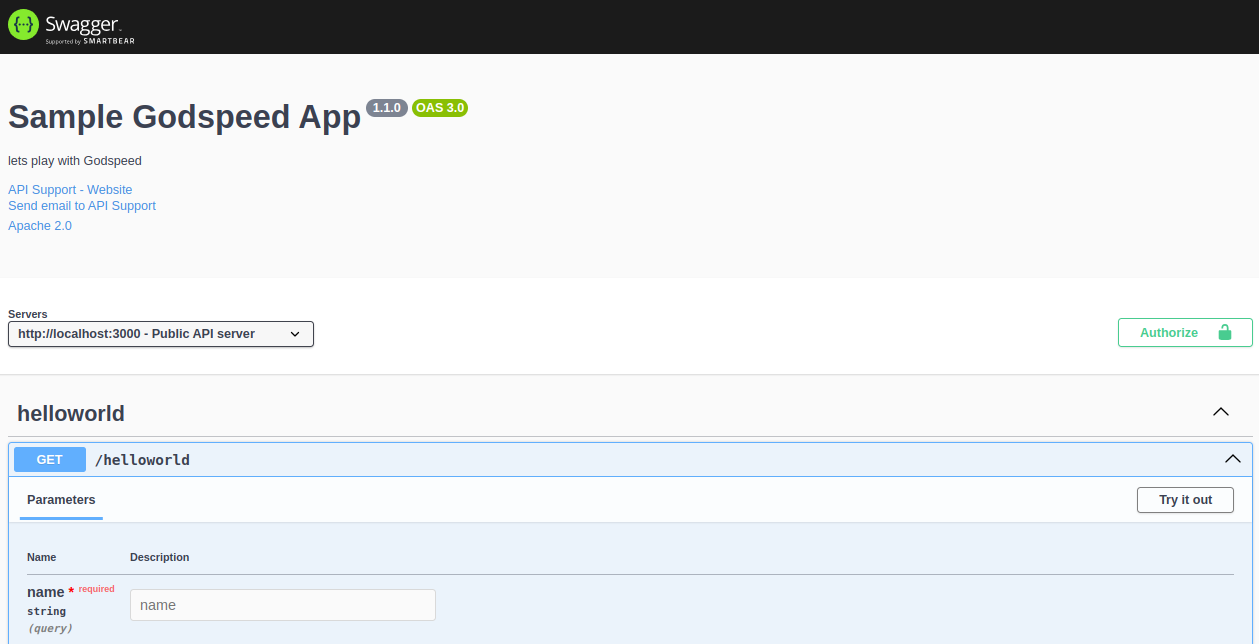
Test the Helloworld API
In the Swagger UI, locate the
/helloworldendpoint.Click the
Try it outbutton and send a request to test the API, It will ask you to fill the name. Once you fill and submit the name parameter,(e.g. John) then following response will be returned from the server.Hello `John`
Troubleshooting
Common Issues
Git Not Found Error
Error: Not Able to reach Template repositorySolution: Install Git and try again
Windows Script Execution Error
Running scripts is disabled on this systemSolution: Run PowerShell as Administrator and execute:
Set-ExecutionPolicy RemoteSignedPort Already in Use
Error: Port 3000 is already in useSolution: Stop other services using port 3000 or modify port in
src/eventsources/http.yaml
To understand working of this API Lets Walkthrough your first Godspeed Project
Walking through your first Godspeed project
- Scaffolding of a meta-framework project
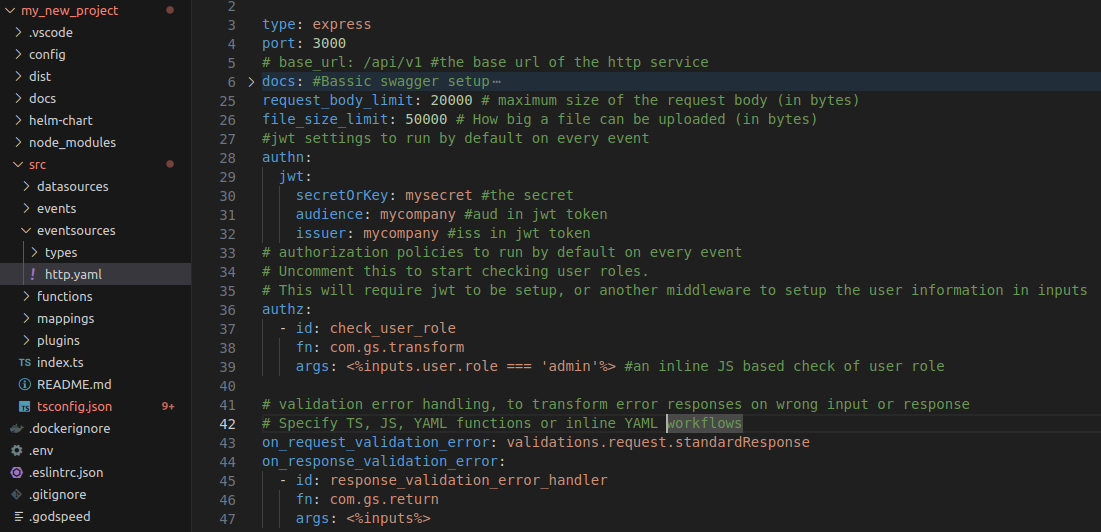
- The framework generates different folders like config, datasources, events, eventsources, functions, mappings, plugins,etc
- The
eslintrc.jsonfile includes a curated list of recommended plugins that can be incorporated into the project. - We configure swagger specs in src/eventsources/http.yaml
To understand more about the scaffolding structure of the project , Check here
Why is Swagger asking you to fill the name?
/helloworld API endpoint asks you to fill in the name parameter because the API has been configured to require this parameter as part of the query string. Go to
src/events/helloworld.yamlfile, which is the event schema of this API in YAML format.http.get./helloworld: # `http` server listening via `get` method on `/helloworld` endpoint
fn: helloworld # the function handler to be called for this endpoint, available in `src/functions`
params: # JSON-Schema of API parameters like query, headers, path params. Note: This is set as per Swagger standard's `parameters` syntax
- name: name # This is our name query param
in: query # Notice the in: query, it can be `path` or `headers` as well
required: true # true means `name` parameter is required
schema:
type: string
responses: # JSON-Schema of API responses for different status codes. Note: This is set as per Swagger standard's `responses` syntax
200:
content:
application/json:
schema:
type: stringIn this helloworld.yaml file, the params section defines that the API requires a name parameter to be passed in the query string. Let’s break it down:
params: This section describes the input the API expects. In this case, the API expects a name parameter, which must be provided by the user when they call the /helloworld endpoint.
name: name: This line specifies that the query parameter is called name.
in: query: This tells Swagger and the Godspeed server that the name parameter should be included in the query string of the URL (e.g., /helloworld?name=John).
required: true: The name parameter is mandatory. This means the API will not work unless this parameter is provided by the user.
schema: { type: string }: The name parameter must be a string, which further validates that the input should be text.
In the Godspeed meta-framework each API whether REST or Graphql API is called an event. All events, whether API calls or websocket messages, trigger workflows/functions which can be thought of as event handlers (see fn: instruction in the yaml above).
The sync events return a response while async events dont have a concept of response.
This naming approach may be new for you. The general norm across the larger developer community is to call only async events as events - for ex. Kafka or web socket message. But in Godspeed world we consider both sync APIs (REST, Graphql) and async events (Message bus, web socket, cron) - as events.
Testing the validation of API inputs and outputs
Almost every application needs validation of data sent in request to the API and response sent back by the service, to make sure that wrong data could not enter your service nor should it return wrong response for an API call. Let's try this feature in the framework.
- Open your browser and hit the
/helloworldendpoint vialocalhost:3000/helloworld. Or, runcurl -i localhost:3000/helloworldfrom your terminal. - This should return an error with code
400because you have not passednamein query - as expected by the schema ofhelloworldAPI.
{
  "validation_error": {
    "success": false,
    "code": 400,
    "message": "request validation failed.",
    "error": "must have required property 'name' in query",
    "data": {
      "message": "The API cannot be executed due to a failure in request params schema validation.",
      "error": {
        "instancePath": "",
        "schemaPath": "#/required",
        "keyword": "required",
        "params": {
          "missingProperty": "name"
        },
        "message": "must have required property 'name' in query"
      }
    }
  }
}
- If you hit
localhost:3000/helloworld?name=mastersilv3r, it should work.
Hello mastersilv3r
Swagger Collection
If you need access to the Swagger collection of godspeed project, open it from /docs folder in your project. This is automatically generated from your API schema which we saw above.
Postman Collection
If you need the Postman Collection, import the Swagger file from src/docs in Postman.
For any help
Try the below command line which will show you the commands that can be used in the godspeed framework. Refer the full CLI spec for more information, including how to add plugins for eventsources and datasources
godspeed --help
Video Tutorial - Short
There is a longer and detailed introduction video as well, below on this page.
If you want some pre-made examples please check the examples repository
Video Tutorial - Longer and in depth
Walkthrough the Loan Origination System project made using our meta framework